The Kaltura upgrade is not as perfect as we anticipated! While we were able to predict and resolve many issues we were not able to resolve all. Please see the Kaltura upgrade FAQs we have created for you, these FAQs are common issues that require intervention from you .
UPDATE, JUNE 23: As of today, we believe we are back on track, though with lots of work still to do.
The error with Google Chrome embeds in Moodle should be addressed. If the issue is persisting for you, please restart your browser. You may also have to “Clear Browsing Data” and then restart. If these steps do not resolve your issues, or if you need assistance, please contact Moodle Support – moodlesupport@tru.ca.
Videos uploaded between May 29 and June 17 (292 of them, it appears) will not be accessible to users in their My Media gallery, and will not be re-added until July. We share instructions on how to re-upload videos below, and if this is not possible (for example, if you had students submit them for an assignment) we may be able to help recover them. And again, we hope to run a process in mid-July to update broken links and embed codes in Moodle so they point to the new server (though we cannot be sure how effective this process will be until we run it).
The public facing portal at https://media.tru.ca should be available again. Unfortunately, embeds and links on external websites will need to be updated manually. If you have questions or need help please contact Moodle Support.
Contact moodlesupport@tru.ca for more information and assistance.
We regret when anyone in our community experiences disruption and inconvenience. We are truly appreciative of how patient and accommodating our users have been through this process.
If you created and uploaded videos to Kaltura between May 29, 2022 and June 17, 2022 they will not have been transferred to the new Kaltura server. They will be automatically transferred in July 2022. We do understand that this may be to late and if that is the case you are able to re-upload the video(s) to My Media. We recognize this is a duplication of work and apologize for the inconvenience. Their are two main options for finding and re-uploading Kaltura Capture recordings. Both methods can only be performed from the computer that was used to make the original recording.
This is the most nimble way of re-uploading recordings made using Kaltura Capture.
- Open Kaltura Capture
- On the right of the Kaltura Capture recording interface, click Manage

- On the Manage screen go to Library (this is default)
- On the list of recordings, locate the recording you would like to upload and click Re-Upload
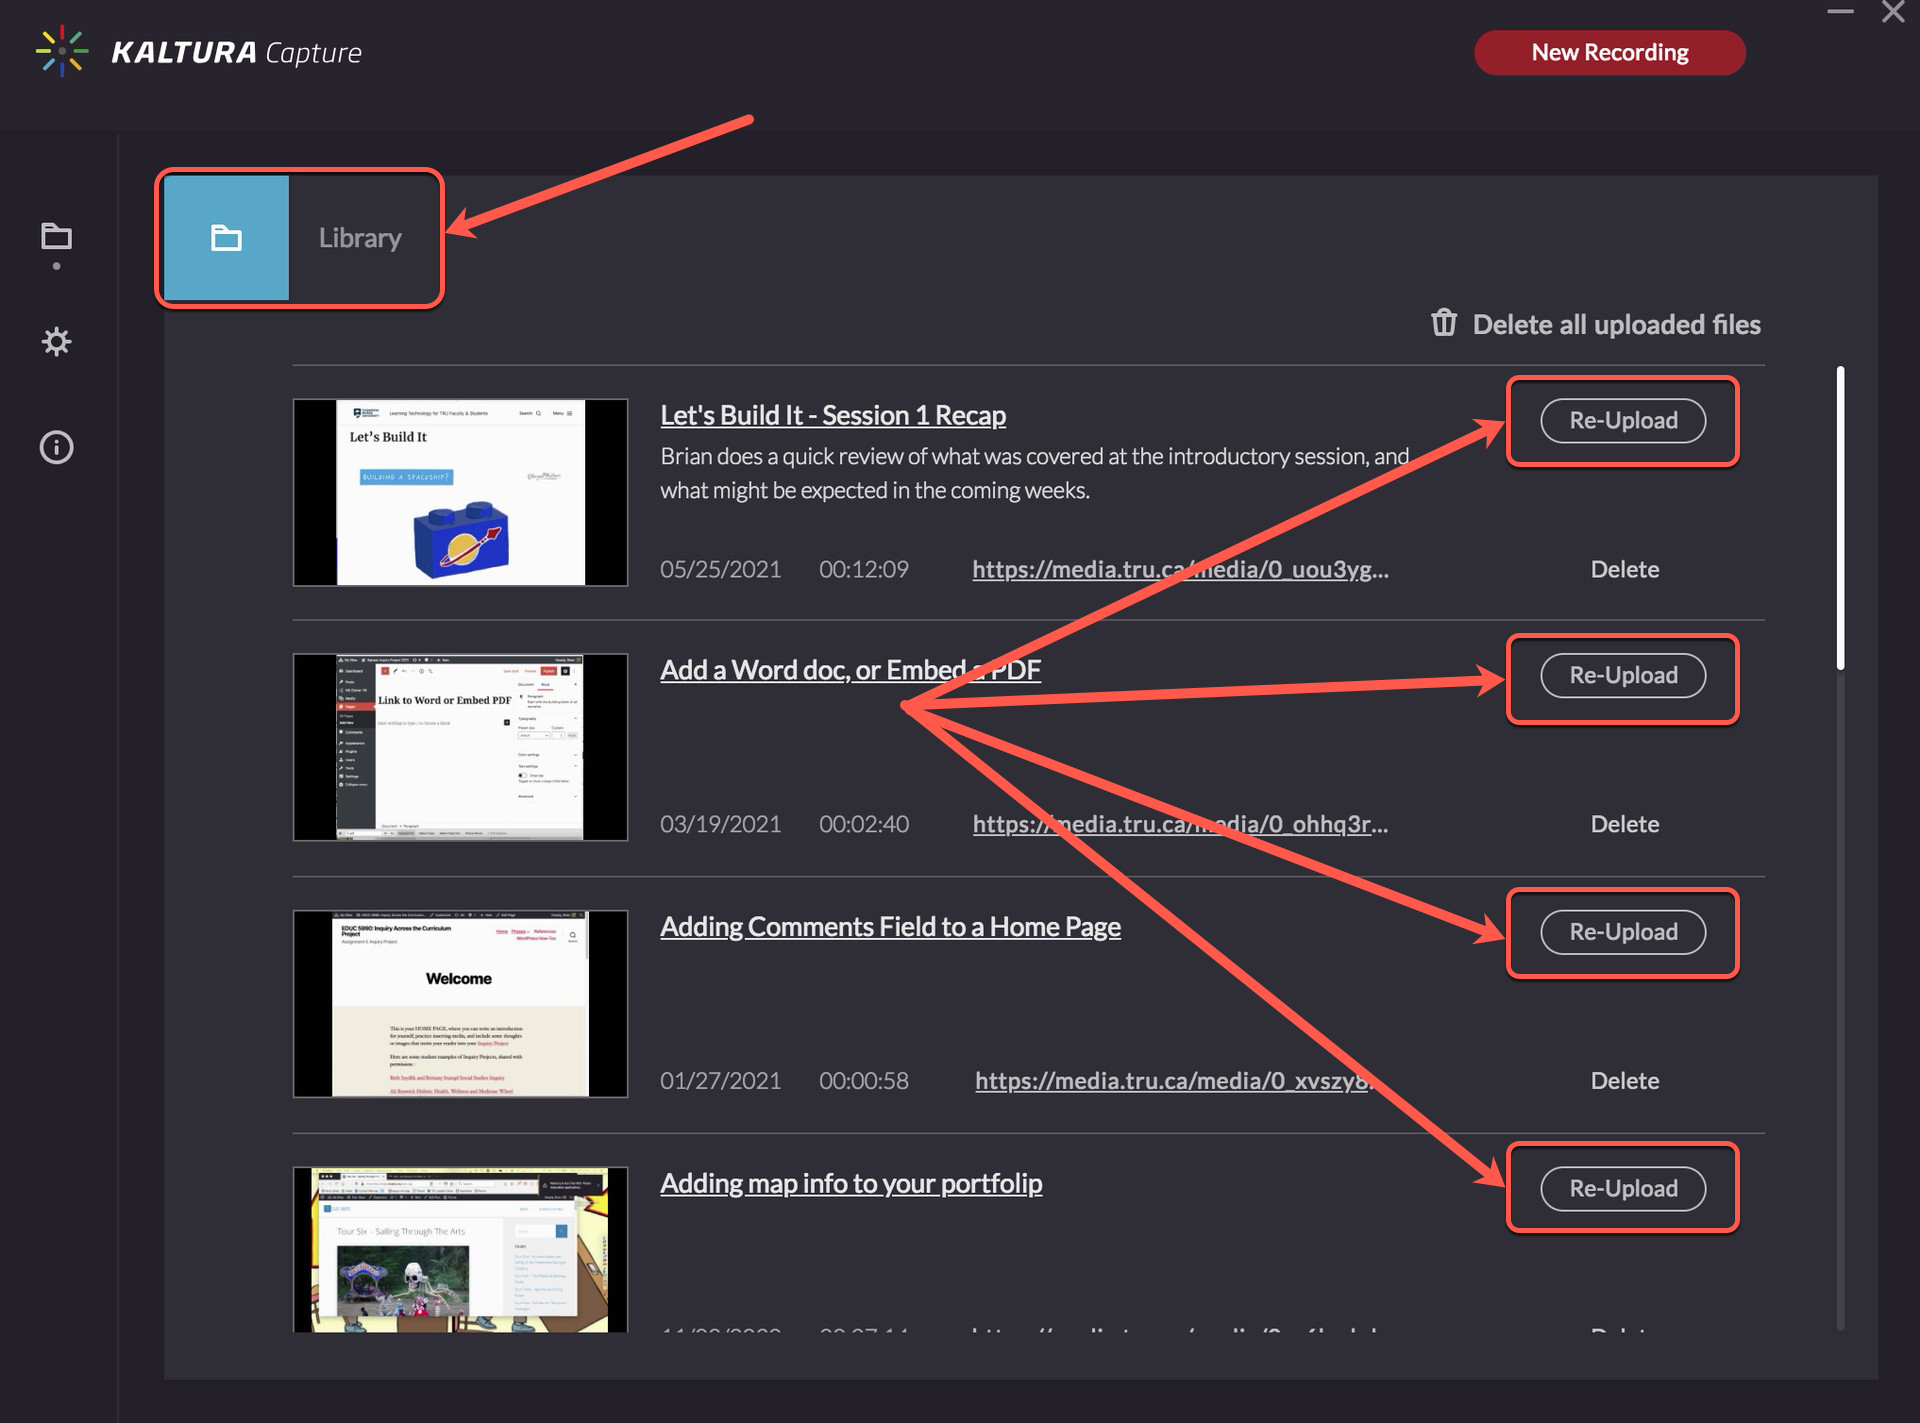
- The video will automatically be uploaded to My Media, you will need to add it back to you Moodle course. Please see the Adding instruction under Option B.
The following instructions outline how to locate your videos on a Windows and MAC computer then they cover how to upload those videos to Moodle and add them to your Moodle course(s).
On Windows
- Right click on the Kaltura Capture icon on the desktop.
- Select Properties.
- Click on ‘Open File Location’ and go up one folder to the ‘Capture’ folder.
Or simply navigate to C:\Users\<username>\AppData\Local\Kaltura\Capture\
On MAC
- Go to the Finder.
- From the Go menu, select Go to Folder.
- In the form, enter ~/Library/Preferences/Kaltura/Capture/
- Click Go.
Or simply navigate to: /Users/<username>/Library/Preferences/Kaltura/Capture/
Re-Uploading the Video
Once you have located the video you can save it to a more convenient location or simply remember how to navigate back to it. You will need it’s location for re-uploading the video. There are 2 stages to re-uploading a video to Moodle. First is UPLOADING the video to “My Media”, the second is ADDING the video to a course.
UPLOADING
- In your Moodle dashboard Go to -> My Media, where all your videos will be saved.
- Click on Add New and choose Media Upload
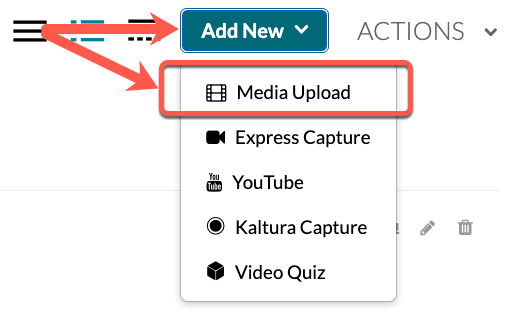
- Choose the file you want to upload by finding it on your hard drive.
- Update the name (if you want) and add a description, scroll down and choose Published then click Save (Please note that you may have to click Save then select the Published option and click Save again.)
- Optional – under Publish in Gallery, choose the course and section you would like to embed the video into, be sure to Save your changes.
ADDING
- In Moodle, go to the course and section you would like to add the video to.
- Turn Editing on and click Add an activity or resource in the section you want it to appear.
- Select Kaltura video resource in your options, click Add
- Give the activity a Name and under the Video heading click the Add media button
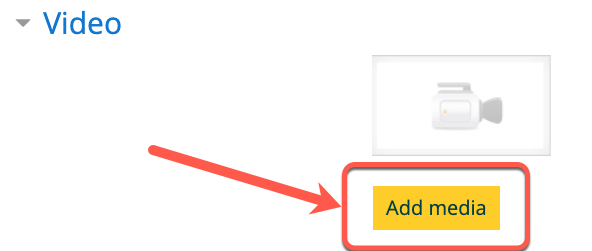
- In the pop up window click the </>Embed button for the appropriate video, click Save and return to course.


